Some of these links may be affiliate links. Read my full disclosure here.
Today, I’d like to share another DIY project I did for our wedding.
I had a TON of fun designing the invitations (a little bit less fun putting them together… lol). Knowing I was going for a ‘country classy’ type look and that I love Kraft paper, I scoured pinterest for inspiration. This was the spark for the whole project:

After seeing these gorgeous invites I knew I wanted to DIY lace wedding invitations using doilies and kraft paper.
The layout of the invitations was based on this next invite: (I seriously spent way too many hours of my life obsessing over font choices and styling ;))

For the paper I bought 250 8.5×11 Kraft paper sheets for $45 (I recently found them here for less, I used the 100 cover weight, Desert Storm). The invites took around 90 sheets and I ended up using nearly all the rest for other wedding paper projects. All the printing was done at Staples, they are very reasonable.
Here is a close up of the invite sans the doily… I sometimes just sit and stare at it, because I love it so much… 🙂

But, seriously… I’m sure I spent over 5 hours meticulously analyzing every font in the world… haha 🙂 I was going for a more contemporary and fun layout with words that popped, versus the traditional invites in the cursive. Those are pretty too, but I was going for ‘gripping’ 😉
If anyone is interested in knowing any of the fonts, or wants a copy of the wedding invitation template I used scroll to the bottom of this post.
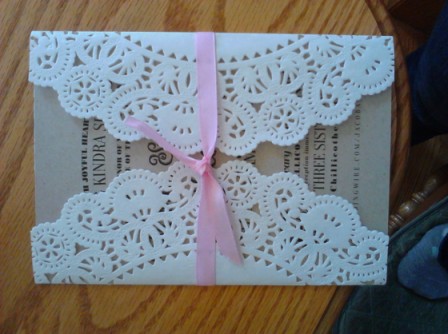 I bought the Doilies for around $10 off of the Webstaurant store (it came in a package of 500!) Putting it all together was pretty simple. I centered the doily around the invite, folded, then used a craft paper cutter to remove the excess doily on the top and bottom.
So I took these pictures before I made most of them, and I actually ended up tying bows instead of knots like the one above. Tying the ribbon was a learning process, but the more I did the better I got. Jake graciously offered to assist me, but after ten minutes of laboring over one bow, he asked to be relieved of his duties 😉 Men’s fingers are just not cut out for these sorts of things…
For the RSVP postcards I had them printed and cut at Staples, then I used stamps I had and embossed the back. They looked so pretty with the black shiny 🙂 I wish the picture captured it better….

My mom and sisters helped me a TON with these… I mean like many hours of cutting, tying, stamping and embossing, not to mention envelope licking, stamping, and addressing… You gals are the best! 🙂 And, I should mention that Jake helped me a lot too, who would have thought he has a knack for embossing? 😉
Again, if anyone is interested in fonts used/more information on the embossing process, I’d be happy to fill in more details! Thanks for reading about my DIY lace wedding invitations. If you like my blog, I would love for you to follow me (by email or bloglovin’ in the right sidebar) or view my Pinterest. 🙂
Update:
I’ve been so flattered by the positive responses to our wedding invitations! After getting several requests for the template, I’ve decided to make it available for download here. It is in Word form and remains largely the same as I designed it… meaning that while it is not the cleanest or simplest template ever, it is fully customizable!
(please read the instructions prior to download!)
Instructions for Template Download
1. Download and Install these fonts:
- Oranienbaum
- Chalk Hand Lettering Shaded
- LT Nutshell Library
- Romantiques
- Janda Elegant Handwriting
- Sail
- Some Weatz with Swashes
- Decadence
2. Download Invitation and RSVP Template
3. Personalize and Format
You can customize the invitation and rsvp by clicking in the text boxes and typing your wording. For the wedding location text box on the invitation (bottom right), I adjusted the font spacing in order to make each line the same width. You can adjust this as well by selecting the line of text, right-clicking, selecting font, then the advanced tab. From there you can condense or expand the text by playing with the spacing. You can also try this technique on the reply by date for the RSVP.
Other Information:
- Printing: Staples
- Size: A7 (Cut 1.5 inches off the bottom, 1″ off the right side, and in half vertically)
Pingback: DIY Rustic Wedding Invitations – Gooseberry Creek Farm
Hello! I would like a copy if you are still willing to share! The link above doesn’t seem to be working. Thank you!!!!
Hello! I would love a copy of your template if it is still available! They are so pretty!
Pingback: DIY Doily Lace Wedding Invitations |
Did you adhere the doilies to the back of the paper, or just fold and tie? I’m looking for a safe spray-able adhesive that will hold them. Suggestions?
Thanks so much for posting this. I used your templates to make the evening invites for my wedding a few months ago. I hope you don’t mind but I’ve linked to you from my own blog about the wedding. Its at https://bloggingthefourcs.wordpress.com/2016/10/28/today-was-a-fairytale/ if you want to check you’re happy with the link x
Rachel, your invites turned out absolutely beautiful! Thanks for sharing 🙂 And oh love your flowers!!
Pingback: Today was a fairytale | blogging the four c's
Hey! I’m so glad I found this post!! I absolutely love these diy invitations. Where can I find the lace outside and what other colors do they offer? We are looking for silver or gray. Thanks so much!
Pingback: How to make your own wedding invitations: the definitive guide
what size doily did you use? I have a similar idea for my invites ( which are going to be 5×7) but I’m not sure what size doilies to buy. I’m thinking 10 or 12 inch to fit around them? thank you!
Thanks so much for posting these. We’re using the design for our evening invites- I’m not brave enough to make all of them myself! Spent ages looking for one that fit with our wedding and wasn’t ridiculously fiddly. Thank you for making the instructions so clear and including the template and fonts, you’ve made it so much easier to be creative!
love them !
ok i answered my own question, if it even posted because i don’t see it now lol
but i was wondering about the embossing process if you could offer an info
thanks!
Did you adhere the invite to the doily? If so what did you use?
I LOVE your invitations and will be using them for my upcoming wedding!! I am having problems with the font used for the “with joyful hearts” and other various places on the invite. I guess its just not showing up on my computer even though I downloaded all the fonts you listed. My computer switches it to a different font. Can you tell me which font you used? Thanks!
Hello!
I am interested in seeing how you connected the doilies in the back.. Can you email me a photo of the back?
Thank you!
Would love the template to both your invite and RSVP card! You did an excellent job 🙂
hi, i am in the process of putting together an invite for our wedding. i was wondering if what size of doily paper that would fit into a 5×7 invite, that won’t look awkward to wrap around it. thank you.
Hi Dona, I used 10″ doilies and they fit around perfectly 🙂
Hi Mrs. Fancee! Thank you so much for all of these templates. I am helping my friend make her invitations and we really wanted to do the back of the RSVP cards the same way you did, without the embossing. Any way you could help us with that? Thanks!
Hey Ashley, thanks for the kind words! Absolutely you could do that! I would say the easiest was is to try and do it in Microsoft Word and play around with fonts until you like it. Then you can get it printed on the back of the RSVP’s. Or if you want it a little more hand-made you’d just need to get a black stamp pad and use that instead of an embossing pad and powder. Just like with the embossing method, you’ll still need clear acrylic alphabet stamps to spell your names and an acrylic stamp block, and an ampersand stamp. (I think some of these are linked in an amazon widget below the article) Best of luck!!
Thank you so much for posting the template on line, these were so easy to edit. I love them!!! I can’t wait to print them and start putting together!!!
That is so sweet and you have no idea how relieved that makes me feel!! I was worried they wouldn’t format right on other’s computers, so glad it was easy for you 🙂 🙂
Can i get a copy of the template at well? ellison5561@gmail.com is my email thanks!!
Hello, actually if you click the link at the top of the post to the template page you can read the instructions and download there 🙂
Hi. Thanks for sharing your invites along with providing links. I was just wondering, how long did it take for the doilies to arrive after ordering them online?
You know I don’t really remember, a week or two I think?
Can you tell me what size doilies would be best to use? Our invitations are 5×7
Hi Courtney, I used 10″ doilies and had 5×7 invitations as well. That way they just come to the center when wrapped around.
I have been searching ALL night for “THE ONE” and I’ve been going CRAZY thinking I wouldn’t find them. I think I found THE INVITES that I love! Can you please please send me the template??? I would adore that!
Hi Becca, so glad you like them! If you click on the link at the top or bottom of this post you can follow the download instructions to get a copy 🙂
I am in love with this. I have spent hours searching for wedding invitation ideas. this is it. I love it I am planning on using a wider ribbon though and spray painting the doily. what do you think? any idea how much they charge at staples? 🙂
Thank you for that idea! I think I will go with it! so some word in color on the invite? Advice for color of doily and ribbon? Also which paper is best in your opinion I have no idea what weight or anything like that!
Cute ideas, I love it! 🙂 Staples was super reasonable, all of my invitations printed cost less than $20 (I bought the paper separate)
So I was wondering if you could give me some advice! I am doing 3 colors for my wedding: turquoise, orange, and fuchsia. I know I want to spray paint the doilys one of those colors and do a ribbon another color but when it comes to the paper part I have no idea what to do! any ideas? helllppp!!
Hi Nadia, what fun and bright colors! If I were you I would do a crisp white paper to showcase your vibrant colors and make them pop. Maybe you could do some of the words on the invite in turquoise, orange or fuschsia to tie all your colors together. Hope this helps!! 🙂
I am using this idea for my wedding! Thank you so much for sharing! I am having trouble with the RSVP cards. Can you walk me through how you did the stamped names on the back and any ideas where to get the stuff to do them? Thanks!
Thanks Lenae, glad you like it 🙂 To emboss the back of the rsvp, I used a rubber ampersand stamp, and clear (without the wooden back) alphabet stamps. I stuck the clear stamps on a clear acrylic stamp block to spell out our names. I used clear embossing ink to stamp the ampersand and letters onto the back of the rsvp. Then, I covered the ink on the card with black embossing powder, tapped off the excess, and heated with a heat gun to get the embossed effect. You can find all these supplies at Michael’s or most craft stores. Buying online may be cheaper too. Hope this helps 🙂
I’ve been looking everywhere for this diy doily wedding invitations. Thank you so much for sharing
Glad to help 🙂
Hi your creativity is awesome and unique i,love your ideas . Can you please send me your teples please were getting married this comong nov. Thankie so much god bless
Well thanks, Shela! If you click on the link at the bottom or top of this post it will take you to a download page with the instructions. 🙂
What size ribbon and how long did u cut them?
I think I ordered 3/8 inch ribbon and just experimented with the length til I got it right 🙂
Hello!
To anyone interested, I just bought 250 envelopes and 250 pieces of card stock and 500 doilies from the websites given by Mrs. Fancee. I paid about $135.00 total for everything. I will only use about 150 of each and will have plenty of leftovers if anyone is interested!
Thank you so much for the tutorial! It will save me quite a bit making these myself instead ordering pre-made invites!
I cannot wait to get my supplies so I can get started!
I might be interested! Can you email me at ehanback@gmail.com?
Ah, that’s so exciting, Brandy! I know when I ordered I checked the mail like every day waiting for the stuff to come in 🙂 Best of luck!!!
Hi, just wanted to say that we used your template for our wedding invitations and they could not have turned out more perfectly! My partner did all the technical side (technology is not my strong point haha!) and then I put everything together with help from my girlfriends. They look amazing! We posted them the other day and I’ve already received texts from people telling me how beautiful they are. By providing these templates and the fonts you really took away all the stress of doing DIY invitations. Thank you so so much 🙂
Wow, it means so much to hear from someone who was able to use the templates!!! I’m so glad they worked out well for you all 🙂 I totally agree, sometimes the planning in DIY is much less fun than the ‘doing’ when all your girlfriends can come help!! Best wishes on your upcoming nuptials 🙂 🙂
Hello, I tried downloading the template from the website but I was still unable to use them. Could you email them to me, please?
Hi Kasey, I’d be happy to email them to you (my home internet is out though so it might be a few days). But there may be another issue, if you don’t have Microsoft Word, if you’re using some other Word Processor, or if you’re on a Mac computer, the template will not work. Other common issues include not downloading and installing the fonts correctly. Hopefully we can iron out whatever issue you are having!
I love this site!!! And absolutely LOVE these invitations! I am getting married in September of this year so I’m a little behind on the invites but I am going to attempt to make these. Can I ask what size did you cut the brown paper to? Also what size doilies did you use? Thanks!!!
Thanks for the kind words Amber 🙂 And congrats on the wedding!!!! I used 10″ doilies and for the Kraft 8.5×11″ paper: cut 1.5 inches off the bottom, 1″ off the right side, and in half vertically. Best of luck!
hi I love your invitations and Im gonna try to make them for my coming wedding ,I jusf need some help,can I have more information about the embossing process like what kind of ink and other materials did you use and can u tell me a little bit about the procedure,thank u appreciate it!!
Thanks so much for the kind words! Embossing is a fun, but tedious process. You will need several things: a heat gun (from a craft store, or ebay/craigslist), embossing powder (make sure the powder says ’embossing’ or else it won’t work), and a stamp pad that says ’embossing’ (they are usually white or clear). You may want a glitter tray or something to catch the excess powder, but I just used paper. For the backside of the rsvp cards this is the embossing process I used: first stamp the letters and ampersand on the card using the embossing ink. (it goes faster if you use clear stamp letters and mount to an acrylic stamping block). Then, sprinkle the powder on the stamped paper, lightly shaking back and forth until the entire stamped area has powder sticking to it. Flip over the card and tap lightly to get rid of the excess powder. Then, use the heat gun about six inches away to help the powder and ink react. They will bubble slightly and become raised (this is super fun to watch), and then you are done! Fold the paper and pour the excess powder back in the bottle when done. If you have any more questions, feel free to contact me anytime! Best of luck 🙂
I’m doing something very similar for my wedding invitations! The doilies I found are pretty flimsy though, and kind of see-through. Are the ones you bought from Webstaurant better quality/thicker than the standard doilies you can get at a craft store?
Katie, the ones that we ordered are pretty standard I think, like the thin paper kind a restaurant might have under your plate. They do feel paper-y but still look great 🙂
I ABSOLUTELY LOVE THIS DESIGN I AM CURRENTLY OVER DOING A FRIENDS BRIDAL SHOWER INVITES COULD YOU POSSIBLY EMAIL YOUR TEMPLATE AND ALSO WHAT SIZE DOILIE DID YOU PURCHASE THANK YOU SO MUCH FOR THE POST!!!
Thanks Addie! Glad you like them 🙂 You can actually download the template if you follow the link at the top of the post. And I used 10″ doilies. Best of luck!
Absolutely love these. I am designing my own RSVP postcard. Was there any requirements you had to follow for the post office? I’m just a little nervous. Thanks!
There are some parameters to keep in mind. The post office says a post card must be rectangular,
at least 3-1/2 inches high x 5 inches long x 0.007 inch thick, and no more than 4-1/4 inches high x 6 inches long x 0.016 inches thick. Best of luck!
I love the card!! Just a question,did u stick the card on the doily?
I just folded the doily around the card and tied it together with a ribbon
What size doily did you order for these?
10 inch
I love love love this idea! Your template is great! I had a quick question about the line next to the date. Is there a way to move it? Thanks so much!
Thanks for the sweet words 🙂 And yes, you can move it. You may have to move all of the other nearby text boxes to the side in order to be able select it though. (One of the annoying aspects of working with Microsoft Word!)
I’m planning on using your DIY instructions and making something very similar!! You did an absolutely wonderful job coming up with the design and providing instructions. I am just wondering if it would be possible to use a home printer to print the invitations or if the printing has to be done at a secondary location such as staples. Any feedback is appreciated. Thanks!!
Hi Caitlin, thanks so much for the kind words! If you wanted to print it on a home printer, you could as long as your paper isn’t too thick (I would think anything heavier that’s 80lb cover weight or heavier wouldn’t do well in a home printer). My printer can hardly handle thin envelopes lol. That said, I think you can acutally save money printing it at Staples. My home printer black ink cartridges are around $30, but Staples was able to print all of my invitations and cut them for around 15-20. Hope this is helpful, and best of luck 🙂
That is exactly what I needed to know. Thanks so much!!
A trick I learned from working at a craft store too was to buy the A7 foldable cards and cut them down the crease so you double the amount of cards you have. It depends on the number of invites you make and the cost of a pack of cardstock vs. cards but I got 50 cards and envelopes for $10 which meant I only needed to buy an extra pack of 50 envelopes since the cards would double to 100. Just something to help out future invitation DIYers!
Thanks for the tip, Casey! That is a great idea 🙂 I will definitely do that the next time I’m making invites.
How did you tie the bows so pretty? I can’t get mine like that!
Well… they all didn’t look quite that nice lol. They got better the more I did though, and for the one in the picture (my best one) I tried to make it tiny and then I tugged and pulled the ends until they settled under the loops of the bow.
What was the size of doily you used and what was the size of paper for the invitation?
The doilies were 10″ and I used regular 8.5 x 11″ paper 🙂
Hi, I read through all of the above before asking, but just to be clear…. 10″ doilies, got it….. but what size are your actual invites? I just wanna make sure that 10″ doilies will fit around my a7 cardstock, or should i get 12″? Thanks!
Hi Rana! The invites are size A7. Once you trim 1.5″ off the bottom, 1″ off the right side, and in half vertically they will be 7″ x 5″. So the 10″ doilies worked perfectly 🙂 hope that helps!
did you get the envelops from the same website as the paper? what size did you get?
I got size A7 envelopes I believe from Paper source
Did you glued the doilies on the back?
I didn’t, so they just came off when you untied the ribbon. But, I think that would be a neat detail 🙂
Hello. Another question about the rsvp…. What is the font you used for the RSVP part. I’m going crazy looking for one that is as nice as yours
Oh, I see I forgot to list that font! So sorry about that, it is Decadence (http://www.dafont.com/decadence.font).
I have a question about the RSVP card. you said you used stamps you have and embosses the back. What did you use stamps on and what did you emboss. I could not tell from the picture. Any help would be greatly appreciated!! THANKS
Hi Lorey! Sorry I’ve been MIA the last couple of days. For the RSVP backs, I used rubber stamps from Michaels (one ampersand and a clear alphabet collection on an acrylic block), then I embossed the “Jacob & Naomi.” Basically, you use a special embossing ink, cover with embossing powder, then heat gun it until it bubbles up. It’s a pretty fun process! Just takes a while…
Hello! I love these! I am doing them for my wedding next September! Do you by chance remember what size doily you used? 6 inch or 8 inch? Thanks!!!
I used 10in doilies here: http://www.webstaurantstore.com/10-lace-doilies-500-pack/477102010.html
Congrats and best of luck 🙂
Did it cost extra for postage (with the doily & all?)?
Nope, I just used the regular ‘forever’ stamps 🙂
I was just wondering if you glued the actual invitation to the doily? Like once you had the positioning on it correctly? To send them did you put everything inside the little doily and tie it up, or was each thing put in separately? Thank you soooo much for your help with everything. I’m going to assemble everything this weekend!
I didn’t glue them, folding the doily around the invitation helped it stay pretty well. Then I tied the bows around the doily and invite. Also, I put the RSVP card in the envelope separate from the doily invite card because I was worried people might miss it if it was inside the doily. But that’s just personal preference 🙂 Good luck assembling everything!!
When you put the invitations on the doily, did you cut the doily in half then glue it to the back or was the doily big enough that you could fold it around the invitation?
It was large enough to fit all the way around. I folded the vertical sides over, then cut off the top and bottom excess.
Hi! Where did you find the envelopes? Also, you got the 10 inch doilies?
I did get the 10 inch doilies from the WEBstaurant supply store. And I’m pretty sure I bought the envelopes here: http://www.thepapermillstore.com/50-10-matte-softwhite-envelopes-a7-5-1-4-x-7-1-4-70-lb-text-matte-c-2s-15-recycled-250-per-box.html
Any size A7 envelopes will do though 🙂
I love love love your invitations!! Could you please send me the template I’ve been searching everywhere for invitations that I love, because I’m getting married in December and really want to do my own! Thank you!
Lori, congratulations! 🙂 You can download the template and view instructions here: http://mrsfancee.com/lace-doily-invitation-suite-template-download/ Best of luck!
This is just what I was looking for, please forward the template to me as well.
I’m glad you like them, Kim! You can download the template here: http://mrsfancee.com/lace-doily-invitation-suite-template-download/
These are gorgeous!! Please send me the template too!!
Thanks Kerry! I have made the template available for download here: http://mrsfancee.com/lace-doily-invitation-suite-template-download/
🙂
I stumbled across this fabulous idea while I was looking at invitations on Pinterest! Could I ask for the template? I love this!
Chandra,
I’m glad you like them 🙂 You can find a template and instructions at: http://mrsfancee.com/lace-doily-invitation-suite-template-download/
Good luck!
I love your invitations!! How many invites did you make and what was the final total? I would also like a copy of your template.
Priscilla, thank you very much! I made around 180 invites. In the end, they cost around $160 total, and I had at least $20 leftover in paper. You can find a template and instructions here: http://mrsfancee.com/lace-doily-invitation-suite-template-download/
Best wishes!
Hello mrs francee. So I’ve got the invitations ready. I’m working on the RSVP’s. I’m having a hard time finding the stamps needed. What size in inches are the letters and ampersand?
Finding the right stamps can be difficult! The ampersand I found at Michaels and it measured 2.75″ by 3.25″. I found this one that appears to be the same as mine: http://www.simonsaysstamp.com/servlet/the-40956/Hero-Arts–2012/Detail
For our names, I used clear rubber alphabet stamps and mounted them on a clear acrylic block found at a craft store. The alphabet stamps were this size and a very similar style: http://store.scrapbooking-warehouse.com/491851.html?utm_source=froogle&utm_medium=feed%2Bwizards&utm_campaign=491851&cmp=froogle&gclid=CInr69ChlLsCFdEWMgodCQUAwQ
Hope this helps! and best of luck 🙂
Where can I find a stamp like what you used to emboss the back?
Hi Bailey! To emboss the back of the RSVP cards I used an ampersand I found at Michaels. This one seems to be the same as mine: http://store.scrapbook.com/hro-h5556.html?utm_source=google-shopping-feed&utm_medium=cpc&utm_campaign=google-free-shopping-feed&utm_content=hro-h5556&kw=hro-h5556&cmp=GSHOP&gclid=CLDVoovGtrgCFY1FMgodb2QArw
For the letters, I bought 2 alphabet clear stamp sets at TJ Maxx (similar to these: http://store.scrapbook.com/hro-h5556.html?utm_source=google-shopping-feed&utm_medium=cpc&utm_campaign=google-free-shopping-feed&utm_content=hro-h5556&kw=hro-h5556&cmp=GSHOP&gclid=CLDVoovGtrgCFY1FMgodb2QArw) They also have them at Michael’s I believe.
To make the process much better, I mounted the letters onto a clear acrylic block to form our names with the right spacing for the ampersand. The block I used is similar to this: http://shop.hobbylobby.com/products/4-x-6-mounting-block-with-gridlines-592857/
You should be able to find all this stuff at Michaels or Hobby Lobby 🙂
I’d love to get the template also, hubby and I are re-newing our vows 9-21-13. Gotta get in gear for the invites!
Congratulations Teala! I’ll be sending you the templates soon 🙂
Could I get a copy of your template?
Surely 🙂 I’ll be sending you an email soon!
These invites are so absolutely perfect!!! I am planning a wedding for next summer, and I would love to have this template. You did such a beautiful job, and it would be amazing if you could send me a copy! Thanks so much!
Thanks so much, Rachel! And congratulations 🙂 I’d be happy to send you a copy; expect an email soon!
I love these invites!! I’m getting married next April and this is the exact invitation I have been envisioning! Could you please send me a copy of your template? These invitations would be perfect for our southern country chic wedding!
I’m so glad you like them, Rebecca! Congratulations, and good luck wedding planning, it sounds beautiful 🙂 Expect an email soon!
These invites are EXACTLY what I’m looking for! I already have the paper and everything to make them I was just going crazy trying to decide on what kind of template… please… Save me! 🙂 These are STUNNING! Thank you so much!
Cortney, thank you for the kind words! Glad I could help 🙂
I love love your invites.My wedding is in Feb 2014 could you please send me a copy of your template ?? Thanks
Congrats Deanna! I will definitely be sending you a template soon 🙂
What are the dimensions of your invite?
Oops I forgot to ask…what envelopes did you use for these? Thanks again 🙂
I absolutely love this! Im renewing my vows next May and this is exactly the style invite I’m looking for. Can you please send the templates my way as well? Thank you!
How fun! I will be sending you an email soon 🙂 I used size A7 envelopes, I’m sorry I can’t remember where I ordered them from… The dimensions of the invites are 5.5″ by 7″ (they could easily be made longer though, by cutting less off the bottom)
Love these invites! Exactly what I’m looking for for my wedding in October! Would you send me the template? Thank you so much!
Congratulations on your upcoming wedding! I would love to send you a template. 🙂 You should receive an email soon!
hi 🙂 i stumbled across your invited today and i would love a copy of your template if you can? thank youuuu
Hi Amreen, expect an email soon! 🙂
I will be having a country wedding next fall & absolutely LOVE your design!! Would you be willing to share your template with me, also??
Congratulations Jakie! And thank you so much 🙂 I’ll be sending you a template shortly.
These are adorable! in love. Can you email me a template?
Tiffaney, I’d be happy to share it with you, glad you like it! You’ll be receiving an email soon.
May I please have a copy?? These are so adorable and completely our style! 🙂 they look great!
Thank you, Tara! I will be sending an email your way shortly 🙂
Will you please send me a copy of the template also. It’s prefect! We are having a small vintage country chic wedding it this is perfect!
Thanks Ashlie, and congratulations! I’ll be sending you a copy soon 🙂
Dear Mrs. Fancee,
I looove your invites 🙂 They are so perfect! I’m getting married in October of this year and have been mulling over what style I’d like for our invites! I think you may have just pointed me in the right direction! Could you please send me the template? THANK YOU
THANK YOU
THANK YOU,
Andrea
Andrea,
Thank you, I’m so flattered you like our invites! Expect an email tonight with the template. Congratulations on the wedding!!! 🙂
Mrs. Fancee
I am also interested in your template! 🙂 I am getting married June 2014. Also wondering the whole process to have them printed somewhere. Thanks!
Congratulations Laura! Expect an email soon 🙂 I had them printed at Staples, they are very reasonable and will cut them to size for you. Buying the paper myself also saved money. This is what I used: http://www.thepapermillstore.com/environment-desert-storm-card-stock-8-1-2-x-11-in-80-lb-cover-smooth-100-recycled-250-per-package.html
To print them at Staples, did you go through it online? I am looking at getting them printed there and so far I can’t seem to get them to upload correctly. I am not sure if I am just doing it wrong… but I was just wondering how you did it!
Hi Lori, I actually had the same problem using their online system. I ended up going into the store with a flahsdrive and the people at the copy and print center were very helpful. 🙂
I would absolutely love a template!!! could you email me as well? Thank you thank you thank you…this is exactly what i was looking for!!
Thanks so much, Tracy! I’m glad you like them 🙂 Sending a copy your way!
I would also love a copy of your template, these are absolutely beautiful!
Thank you so much, I will be sending a copy your way soon!
I would love a copy of your template if you are willing to share! These invitations are so cute and exactly what I had in mind for my June 2014 wedding!
I just found ur Invitations and I love them. Could you email template? Cakesby_mel_dee@yahoo.com thank you in advance for your time.
Hi Melanee, you can download the invitations on my site by clicking the link for template at the top and bottom of this post 🙂
I would love to get this template if I could too!!!!
If you click the link at the top of the post, there is a free download page 🙂
Absolutely! I’ll send you an email with the template tomorrow. And congratulations! 🙂
Hello, I would love a copy of this template!
what size doily did you purchase?
Hi. I love your idea for wedding invitation with the doilies. But im having a hard time finding a thickish paper doilies sorta like cardboard. If you know anywhere where i could purchase them can you please let me know
What size doiley did you purchase? This is a really cute idea I would like to try.
Hi Leah, the doilies are 10 inch.
I 2nd Tracy’s motion….Exactly!!! June 21, 2014!!!!
I would definitely love a copy of your template your invites are gorgeous… Country with elegance
I would love a copy of your template if it is still available! I LOVE these invites and they would go great with our decor!
Of course! If you click on the link at the top or bottom of the post it will take you to the template download page with instructions 🙂
Thank you for the kind words! I’d be happy to send you a template, I should be able to send it to you sometime tomorrow.